
1. Download Windows Media Creation Tool from Microsoft:
https://www.microsoft.com/en-us/software-download/windows10
2. Run the Media Creation Tool
- Run the Media Creation Tool.
- Accept the License Terms.
- Select “Create Installation Media (USB flash drive, DVD or ISO file) for another PC.”
- Select the desired language, architecture (32-bit or 64-bit), and Windows 10 edition (Home, Pro, etc.).
- Choose “ISO file” as the media type.
- Select “Next” and choose the location on your computer where you want to save the Windows 10 ISO file.
- The download of the Windows 10 ISO file will begin automatically.
3. Create a Bootable Windows 10 Pro USB Drive
- Download and install the Rufus tool from:
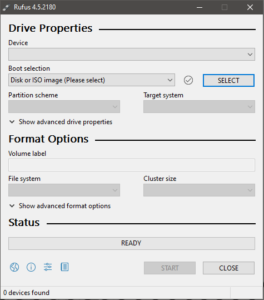
- Run Rufus.
- Plug your USB drive into your computer. (Note: The USB drive must be at least 8GB in size. All data on the drive will be erased.)
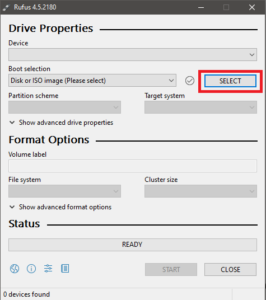
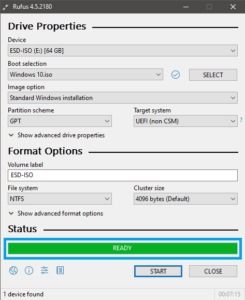
- In Rufus, click the “SELECT” button and navigate to the location where you saved the Windows 10 Pro ISO file. Select the file and click “Open.”
- Important: For computers with 6th generation Intel processors (or newer) and UEFI firmware, select the following in Rufus:
- Partition scheme: GPT
- File system: NTFS
- For older computers with BIOS firmware, select:
- Partition scheme: MBR
- File system: NTFS
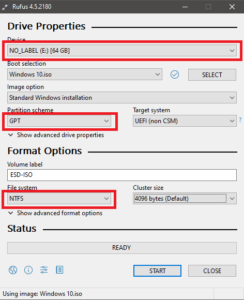
- Click the “START” button.
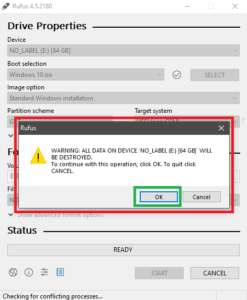
- A warning message will appear indicating that all data on the USB drive will be erased. Click “OK” to proceed.
- Rufus will now create the bootable Windows 10 Pro USB drive. This process may take several minutes. Do not interrupt the process.
Performing a Clean Installation of Windows 10 Pro: A Step-by-Step Guide
This guide is for installing Windows 10 Pro on a PC or Laptop that currently has an older version of Windows (like Windows 7 or 8) or a PC without any operating system. A clean install erases all existing data on the chosen drive, so back up anything important before proceeding.
1. Preparing Your Device for Windows 10 Pro Installation
Before starting the Windows 10 Pro installation, it’s crucial to prepare your device. These steps will ensure a smooth process and minimize the risk of data loss.
Windows 10 Pro System Requirements
Ensure your device meets the minimum system requirements before you download Windows 10 Pro:
- Processor: 1 gigahertz (GHz) or faster with two or more cores on a compatible 64-bit processor. (A 32-bit version of Windows 10 Pro is available but less common.)
- RAM: 4 GB (8 GB recommended for optimal performance).
- Storage: 64 GB or larger storage device (an SSD is highly recommended for faster performance).
- System Firmware: UEFI compatible with Secure Boot support. (Older systems may use BIOS.)
- Graphics Card: DirectX 12 compatible or later with a WDDM 2.0 driver.
- Display: High-definition display (720p) or larger.
If your device meets these requirements, you can proceed with preparing for the Windows 10 Pro installation.
2. Performing a Clean Installation of Windows 10 Pro
With your bootable Windows 10 Pro USB drive prepared (see our guide on creating a bootable USB), you can begin the installation:
- Insert USB Drive: Insert the bootable Windows 10 Pro USB drive into a USB port on your computer.
- Restart and Enter BIOS/UEFI: Restart your computer. As it restarts, you’ll need to enter the BIOS/UEFI settings to configure the computer to boot from the USB drive. The key to access these settings varies by manufacturer (common keys include F2, F10, F12, Del, or Esc). Consult your device’s manual or manufacturer’s website if you are unsure. Look for “Boot Order,” “Boot Sequence,” or similar settings.
- Boot from USB: Save the BIOS/UEFI settings and exit. Your computer should now boot from the USB drive.
- Windows 10 Pro Setup: Follow the on-screen instructions:
- Language and Keyboard: Select your language, time and currency format, and keyboard layout.
- License Agreement: Accept the license agreement.
- Installation Type: Choose “Custom: Install Windows only (advanced).” This is the critical step for a clean installation.
- Partition Management (Warning: Data Loss!): You will be presented with a list of partitions on your hard drive. All data on the selected partition(s) will be deleted. If you are doing a truly clean install, you’ll likely want to delete all existing partitions and then select the unallocated space to install Windows. Windows will create the necessary partitions during the installation process. If you have multiple drives, be absolutely certain you are selecting the correct one.
- Select Installation Location: Select the drive or partition where you want to install Windows 10 Pro.
- Begin Installation: Windows will now begin the installation process. This may take some time. Do not interrupt the process.
- Post-Installation Setup: Once the installation is complete, your computer will restart. You can then remove the USB drive.
That’s it! You’ve now successfully installed Windows 10 Pro. Enjoy your new operating system!